How To Inject A B12 Shot B-12 (Cyanocobalamin) Shot Therapy
B-12 Shot Therapy: how to inject a B12 shot safely and effectively
If you’re considering B-12 (cyanocobalamin) shot therapy, the first hurdle is practical: learning how to inject a b12 shot without causing bruising, irritation, or—worst case—infection. In my hands-on work, I’ve seen the same problem repeat: people rush the injection technique, skip basic skin prep, or misunderstand where the medication is going, and then spend days dealing with soreness and anxiety. This guide walks you through a safer, more confident process, while also helping you decide when shots make sense compared with alternatives.
What you’ll get from this article
- A clear, step-by-step approach to injection technique (so you know what “good” looks like).
- Common mistakes I’ve seen (and how to prevent them).
- How to think about your dosing plan and what to monitor after a B-12 shot.
Understanding B-12 (cyanocobalamin) shot therapy before you inject
Vitamin B-12 (cyanocobalamin) is involved in red blood cell formation, neurologic function, and energy metabolism. When B-12 absorption is impaired (for example, due to pernicious anemia, certain gastrointestinal conditions, or some dietary patterns), shots can bypass the usual absorption route.
Why injections are sometimes chosen
- When oral absorption is unreliable: shots can deliver B-12 directly into muscle (commonly intramuscular).
- When rapid repletion is the goal: clinicians may use an injection schedule initially.
- When dosing consistency matters: some patients prefer predictable administration.
Where technique matters
With intramuscular injections, the “right spot” and correct depth/angle reduce leakage and tissue trauma. In my experience, the most avoidable pain and bruising come from incorrect needle placement, moving the syringe during insertion, or injecting too quickly into sensitive tissue.
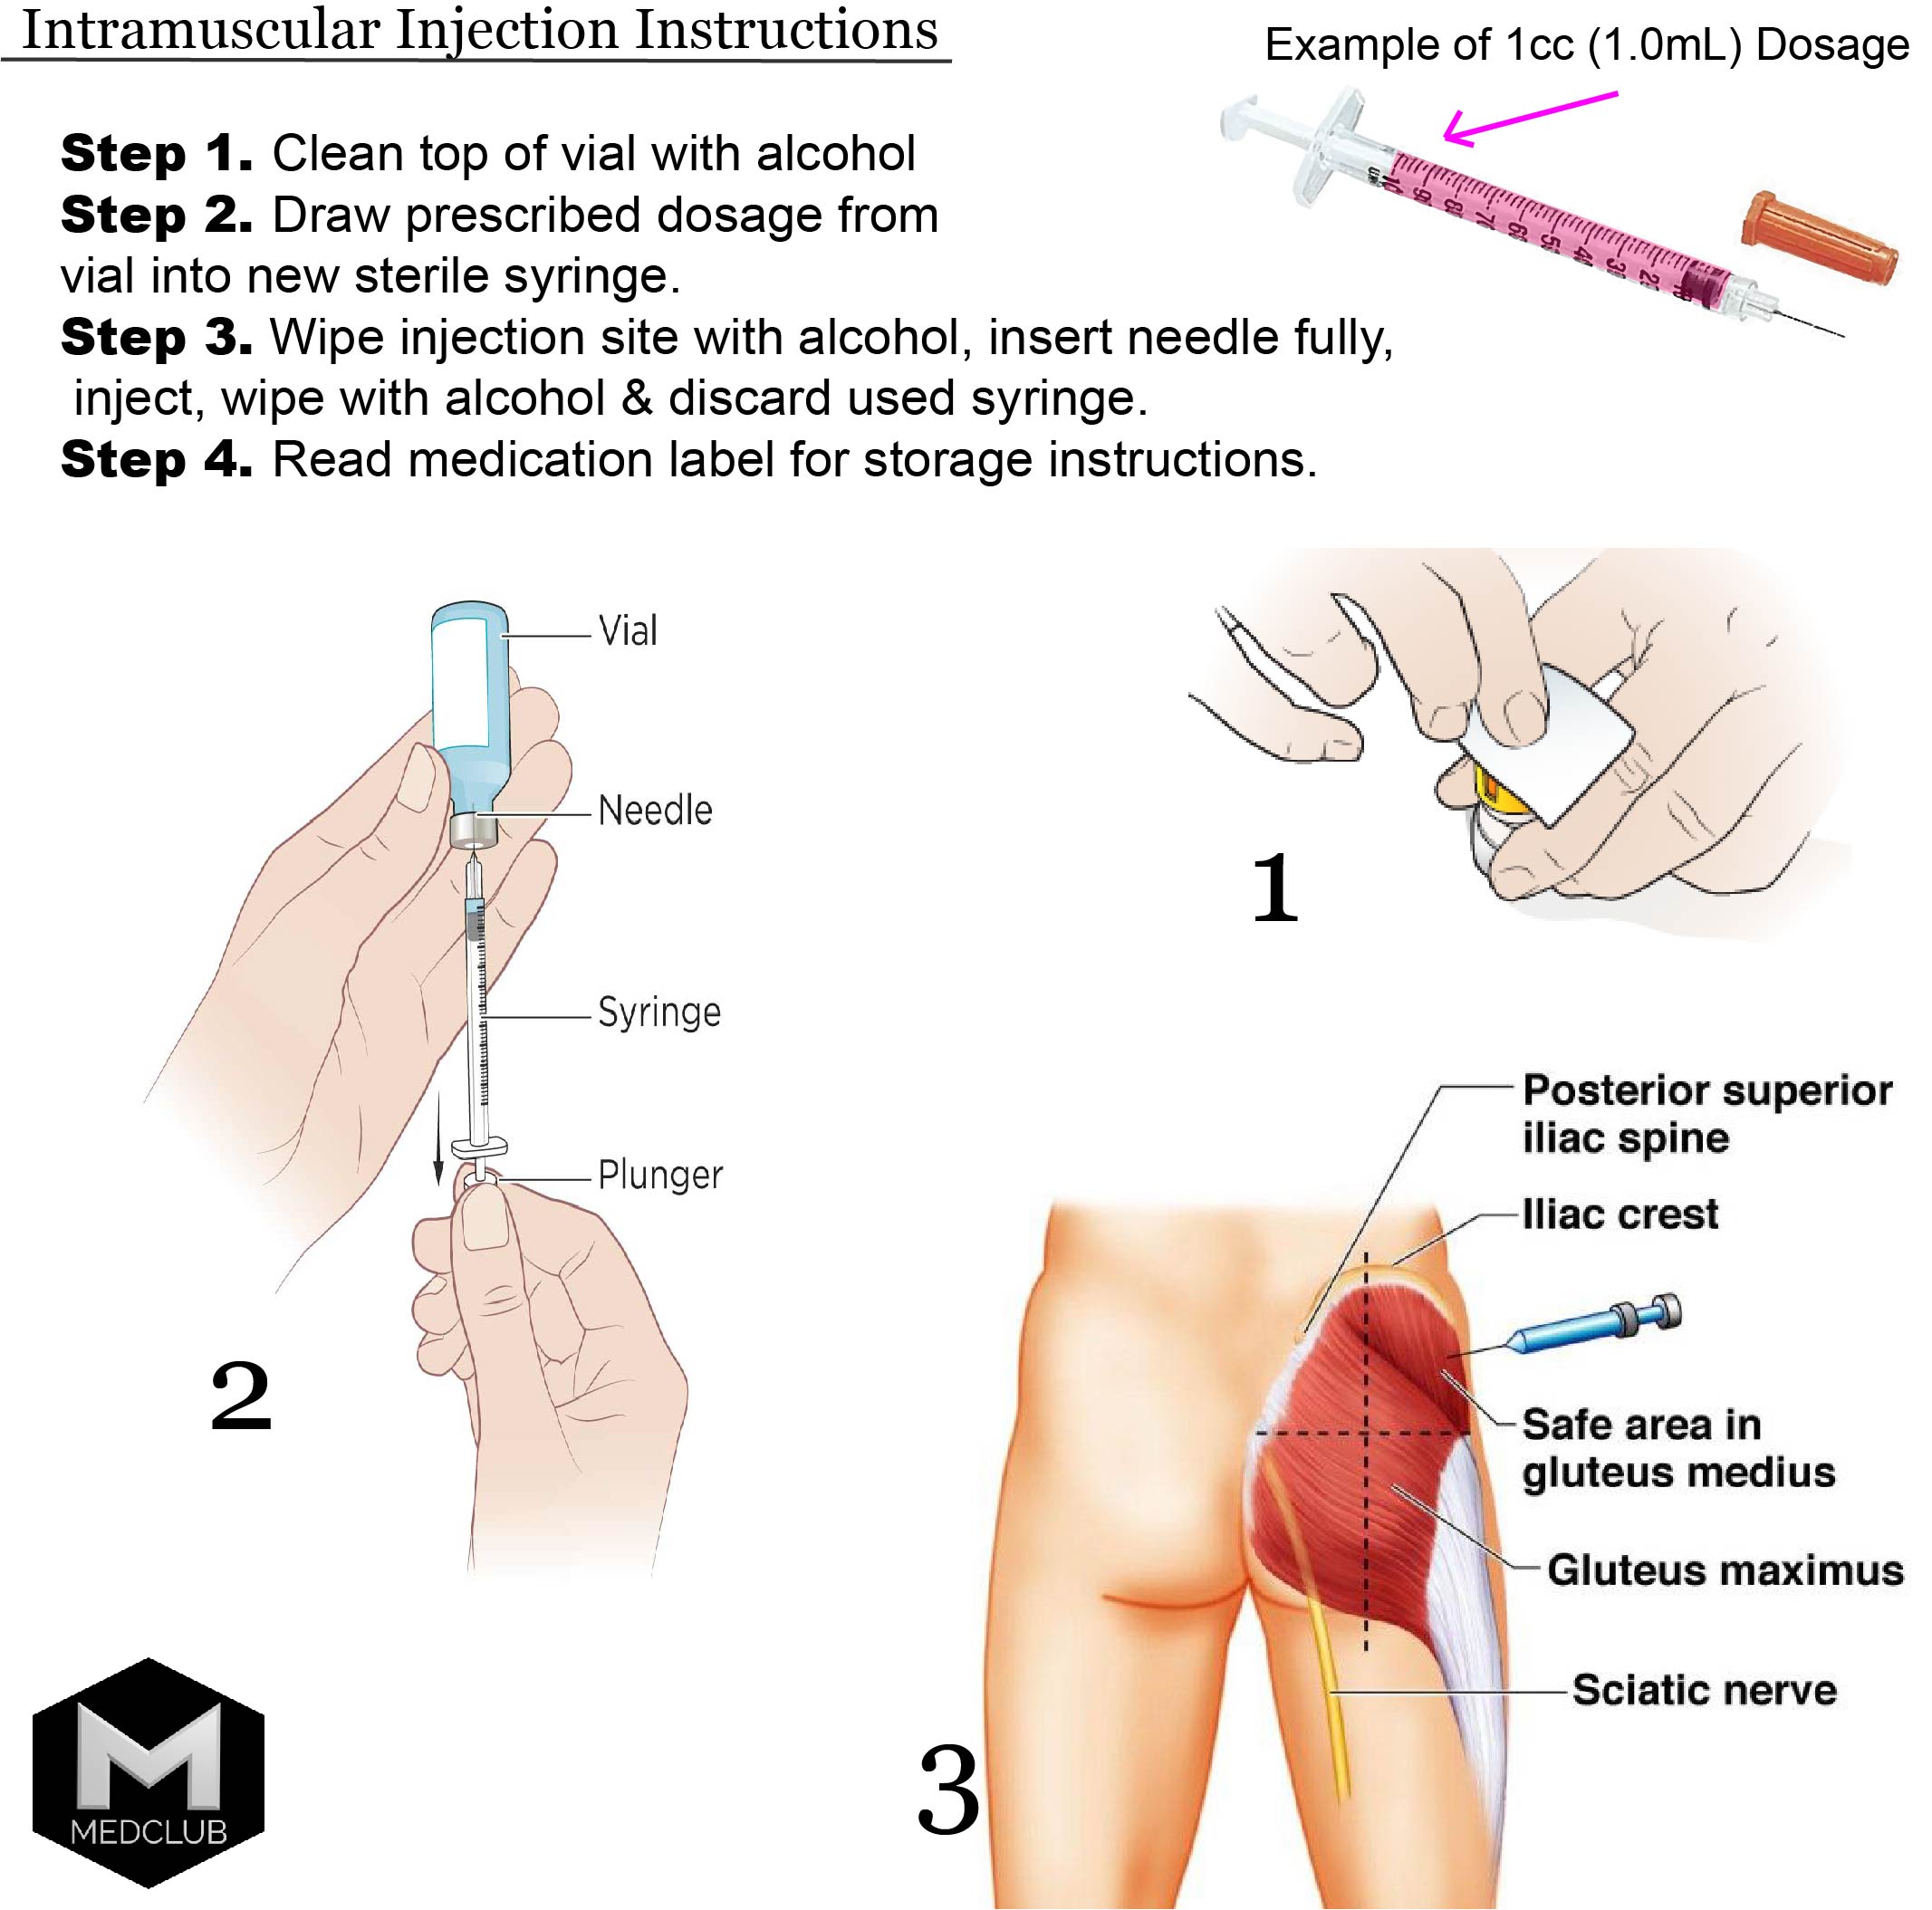
How to inject a B12 shot: step-by-step approach (intramuscular)
Important: Injection instructions should match what your clinician prescribed (needle length, injection site, dose volume, and schedule). If your prescription or training differs, follow that plan. Below is a technique framework consistent with common intramuscular administration.
Step 1: Confirm your prescription and supplies
- Verify the medication: cyanocobalamin concentration, dose, and whether it’s single-use or multi-use vial instructions.
- Choose the correct needle size: needle length and gauge depend on body habitus and your clinician’s guidance.
- Use sterile supplies: new syringe/needle, alcohol swabs, gauze/cotton, and an approved sharps container.
Step 2: Wash hands and prepare the workspace
In clinics, I’ve watched people lose focus here and accidentally touch non-sterile surfaces. Keep a clean, uncluttered surface. Wash hands thoroughly, and use a clear staging area so the needle never contacts your fingers.
Step 3: Prepare the injection site
Common intramuscular sites for self-injection include the thigh or outer upper buttock area (as instructed by your clinician). Your prescription plan should specify the site.
- Clean the skin: wipe with an alcohol swab and let it air dry.
- Inspect the area: avoid injecting into areas with redness, swelling, infection, or unexplained lumps.
Step 4: Draw up the dose correctly
- Assemble the syringe: attach the appropriate needle per your training.
- Draw the prescribed volume: ensure the syringe is free of air pockets to the extent your clinician’s instructions allow.
- Switch needles if your kit/training advises: some protocols use a different needle for drawing vs injecting. Follow your clinician’s method.
Step 5: Inject at the correct angle and keep it steady
This is where “how to inject a b12 shot” becomes more than just a checklist. Use the angle and technique your clinician trained you for (often intramuscular means a near-90° approach, but site/needle length guidance varies).
- Stabilize the tissue: steady the area with your non-dominant hand.
- Enter smoothly: a controlled, confident insertion reduces tissue trauma.
- Inject gradually: I’ve seen faster injection speed contribute to more discomfort. A steady pace is typically more tolerable.
Step 6: Remove the needle and care for the site
- Withdraw carefully: remove promptly after the full dose is delivered.
- Apply gentle pressure: use gauze; do not rub aggressively.
- Dispose immediately: place the needle/syringe into a sharps container.
Step 7: Record your injection and watch for expected vs concerning reactions
After administering a B-12 shot, mild soreness is common. Track date, site, dose, and any symptoms so you can spot patterns (for example, “same-site soreness” or “worse pain after switching vials”).
Common mistakes I’ve seen (and what to do instead)
Most people don’t need “more willpower”—they need safer habits. Here are mistakes that repeatedly show up in practice, along with practical corrections.
1) Skipping proper skin cleansing
Alcohol swabs aren’t about “feeling clean.” They reduce surface contamination. Let the skin air-dry before injecting.
2) Injecting into the wrong or irritated area
If you notice redness, swelling, or tenderness that doesn’t fit your usual pattern, choose another site (per your clinician’s guidance) or pause and ask.
3) Injecting too fast
Speed doesn’t improve absorption, but it can increase discomfort. A controlled injection is usually easier on the tissue.
4) Reusing supplies or delaying disposal
Sharps safety and single-use sterile supplies matter. I’ve seen minor “time-saving” shortcuts create major mess afterward.
5) Not matching the protocol to the syringe/needle guidance
Needle length, injection site, and volume limits aren’t interchangeable. Your clinician’s instructions are the rule—this article is the framework.
What to expect after a B-12 injection (and when to contact a clinician)
People seek B-12 injections for different reasons: fatigue, confirmed deficiency, neurologic symptoms, or anemia-related evaluations. Response timelines vary depending on baseline deficiency severity and underlying cause.
What’s commonly expected
- Local soreness: mild tenderness or bruising at the injection site.
- Energy changes: sometimes gradual; sometimes earlier, depending on the individual.
- Monitoring plans: many clinicians re-check labs to confirm response.
When to get medical advice promptly
- Signs of infection: spreading redness, warmth, pus, fever.
- Severe or worsening pain: beyond what your prior injections felt like.
- Allergic-type reactions: hives, swelling of face/lips, trouble breathing.
- Neurologic worsening: if symptoms intensify rather than stabilize.
Shots vs alternatives: choosing the right approach
Not everyone needs injections. Some people use oral B-12 supplements or sublingual forms, depending on the cause of deficiency and clinician preference.
When injections may be more appropriate
- Documented malabsorption where oral therapy isn’t reliable
- Clinician-guided repletion strategy
- Need for predictable dosing during an initial correction phase
When alternatives may be considered
- Diet-related deficiency responsive to oral intake
- Patient preference after clinician review
- Stable low levels under a monitored oral regimen
In my experience, the “best” method is the one you can follow consistently while staying within a medically appropriate plan. Technique matters, but matching treatment to the underlying cause matters more.
FAQ
How to inject a B12 shot if I’ve never done an injection before?
Start by getting hands-on instruction from a clinician or trained professional who can confirm your site selection, needle choice, and angle. Then practice with a step-by-step routine—supplies, skin prep, injection, disposal—before your first real dose. Keep a written log so you follow the same method each time.
How often should I get B-12 shots?
Frequency depends on why you’re treating and what your lab results show. Many plans start with a repletion phase and then transition to maintenance. Use the schedule your clinician prescribes and re-check labs as directed.
Is it normal to feel soreness after a B-12 injection?
Mild soreness or slight bruising at the injection site can be normal. However, increasing redness, warmth, fever, pus, or severe pain that doesn’t improve should be assessed by a clinician.
Conclusion: your practical next step
If your goal is to learn how to inject a b12 shot safely, focus on the fundamentals: confirmed dosing and needle/site instructions, sterile skin prep, steady controlled injection, and proper sharps disposal. The fastest way to reduce pain and mistakes is to make your routine consistent and clinician-aligned.
Next step: Schedule a brief in-person or virtual check with your clinician (or a trained nurse) to verify your injection site, needle length, and technique for your specific B-12 product—then use a written checklist for each dose.
Discussion